When it comes to showcasing food, there is no better way to entice your audience than by posting a delectable recipe shot featuring your fresh products in a believable way that fits right into the viewer’s lifestyle. This is an important element of your brand’s visual identity that is a direct engagement with the produce shopper.
If you choose to produce your company’s photos in-house versus hiring a photographer, this venture can be costly out of the gate, but will pay off in long run once you understand how to properly use the equipment and snap the perfect shot.
So how do you capture engagement and click-worthy photos to promote your company’s product? We’re giving away our tips in this “tell all” post.
Tips for Snapping the Perfect Recipe Photo
1. Getting the lighting right
Lighting in food photography is key for emphasizing textures, color and the mood or emotion you want to ignite with your audience. We’ve learned over time that lighting a shot from the side is a great way to play with shadows and bring out highlights of certain textures. This helps especially when you are shooting recipes with a lot of different elements, like sandwiches or smoothie bowls. Pick your angles of light specifically for each image, and know that lighting that worked for one shot may not work for another, even for recipes that seem fairly similar at first. Additionally, certain angles can cause harsh shadows that make the shot appear unappetizing. When this happens, adjust your lighting or angle to recapture the beauty of the shot.
2. Picking the right angle
Angles are a great way to elevate the “focal point” or “star” of the photo in unique and artistic ways so don’t be afraid to try new and creative approaches! A side angle won’t always work for every dish, but straight-on and top-down photos are typically great angles to help display your recipe. When selecting an angle, consider the focal point of the photo – and position your angle accordingly.
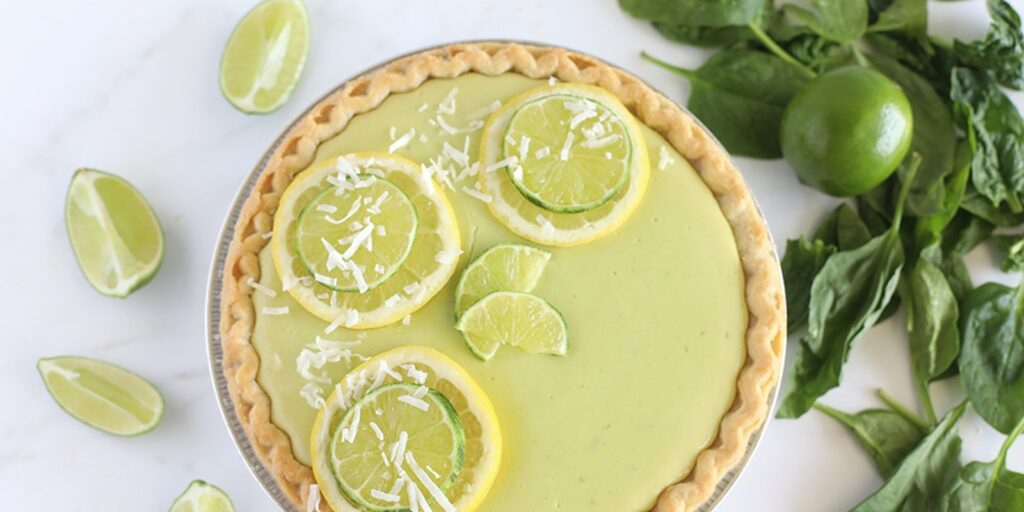
3. Plating to create a mouthwatering moment
Plating is the aesthetic arrangement of the food. After all, when it comes to social media, how you stage the scene and arrange the plate is nearly as important as the food that goes on the plate. The Department of Psychology at Montclair State University released a study that found when food was presented in an arranged manner, customers regarded it as higher quality. The study also pointed out that consumers are likely to pay more for products that are presented neatly.
It is important to understand your desired aesthetic when plating and choose your surfaces carefully: a more colorful recipe will tend to pop more on a white plate or dark surface whereas a more neutral-hued dish will be heightened by a wooden surface or background.
4. Styling to set the scene
Though styling sounds similar to plating, styling refers to everything that happens off the plate. Before you start arranging, think about the scene you are trying to portray. Even though the photos are technically staged, chances are you do not want your photos to appear to be fake! The art of this involves painting a full picture with the foreground and the background. Align this with how you select your surfaces for the photo.
For example, if you know you are trying to portray a kitchen scene, think of how to involve cooking utensils, ingredients, and other household items in order to help make the scene feel genuine and believable. Take advantage of all available ingredients, and don’t be afraid to experiment! For instance, when looking to showcase a baked pastry, we like to sprinkle sugar or flour in the foreground to reinforce a “sweet” tone vs. a savory one.
Pro Tip: Having a style guide for your brand photography aids greatly in deciding how to display your products.
5. Editing your recipe photos
Now that you have a camera card full of photos, you must consider editing your shots before sharing them with audiences. Editing your recipe images well can create the cherry-on-top effect that we marketers (and our audiences on social!) love. A word to the wise: light touch-ups are typically all you need; over-editing can compromise the image and defeat the purpose of trying to appear genuine and relatable.
Sharpness, white-balance, brightness, contrast, and saturation are the main points to adjust and should be based on your brand’s visual identity. If your brand favors warmer-looking images, adjust the white-balance in order to add a bit more warmth to the white parts of the scene (such as plates or napkins).
Once your photo is “picture-perfect,” all you have left to do is pair it with relevant and enticing copy that urges the shopper to like and engage with the image. After that simply post it for your social audience to enjoy and share!
Looking for ideas on where to get started when selecting your photography equipment? You’re in luck! We’ve just launched a new photography equipment checklist including the equipment you’ll need to get started.
{{cta(‘2ad16cba-fe1e-4622-a1f8-403bc3eb0359′,’justifycenter’)}}